LinkedIn’s tracking feature, which is sometimes known as its Insight Tag or Tracking Pixel, allows you to measure the amount of conversions you get via your LinkedIn ad campaign. This also includes your sponsored content.
Regardless of the focus behind your campaign (purchases, downloads, or sign-ups, etc), this tracking feature, once installed (which we’ll teach you!), will appear next to the current platform KPIs (key indicator performances).
While this is easy for seasoned LinkedIn marketers, it can be a minefield for those new to the platform or to utilising it as a business tool. So, with that in mind, this article offers a complete guide to LinkedIn Tracking for beginners. Nonetheless, you can also hire a reliable LinkedIn ad agency to assist you in implementing the LinkedIn tracking.
1 – What is the LinkedIn Pixel (LinkedIn Insight Tag)?
It may be a tad confusing that it has several names (Insight Tag/Tracking pixel), but it’s the same thing, and its purpose is to serve as a marketing tag that helps you monitor the success of your campaign/s on LinkedIn.
To simplify how it works; it is a small piece of coding that you input into your website that helps LinkedIn identify what a lead does once they’ve clicked on your campaign’s CTA (call to action) and have been taken to your website. How it works is it will let you know via your LinkedIn KPIs if a lead has been converted via a purchase or sign-up, etc.
2 – How Does the LinkedIn Pixel Work?
This is a techy part of the platform that works the same way as website cookies do. The Insight Tag will create a cookie when your website visitor has found their way to your site via LinkedIn. It then tracks their actions while they’re on your site and also allows you to pull data from their LinkedIn profile for you to then follow up. Once it’s done this, it’ll then provide you with a report to help you measure the success of your LinkedIn campaign.
Just a little word to the wise – transparency here is important. It’s recommended to always be honest regarding the use of data plucked via your Insight Tag. LinkedIn does indeed provide user agreements that allows you to use the Pixel without users having to opt-in on every webpage, but that said, it usually bodes well with leads if you’re honest about your data collection policies and usage, in case they ask questions about how you got their data, and aren’t impressed with the lack of Pixel warning.
3 – How to Install LinkedIn’s Insight Tag?
So, if you’re keen on installing the Insight Tag to better track your leads’ behaviour on your website, here’s what you need to do:
– Sign into your Campaign Manager, if you’re not there already.
Go to your personal or company’s LinkedIn profile and find the “Advertise” option in the upper right-hand corner; once you’ve clicked on it, you’ll be taken to the “Campaign Manager” page.
– Select your Ad account.
This is fairly self-explanatory. If you have more than one ad account, make sure you’re selecting the right one.
– Click on the account Assets dropdown.
Next, find the “Account Assets” tab on the right-hand side of the top navigation menu and click on it to activate the next dropdown menu, then click on “Conversion tracking”.
– Click on “Data sources” tab and Select ‘Install my Insight Tag’.
If you’ve never selected the “Install My Insight Tag” for any previous ads, select it now. It will appear in a blue box.

– Choose how you’ll install the tag.
There are three ways to do this and it’s up to you as to which you prefer. They are:
– Installing it yourself.
– Sending the tag to a developer to do for you.
– Using a tag manager, such as Google, Adobe, or Tealium.
– Copy the tag.
This is applicable only if you opt to install it yourself. Once you’ve clicked “I Will Install the Tag Myself”, then copy the code into the code box that will appear.
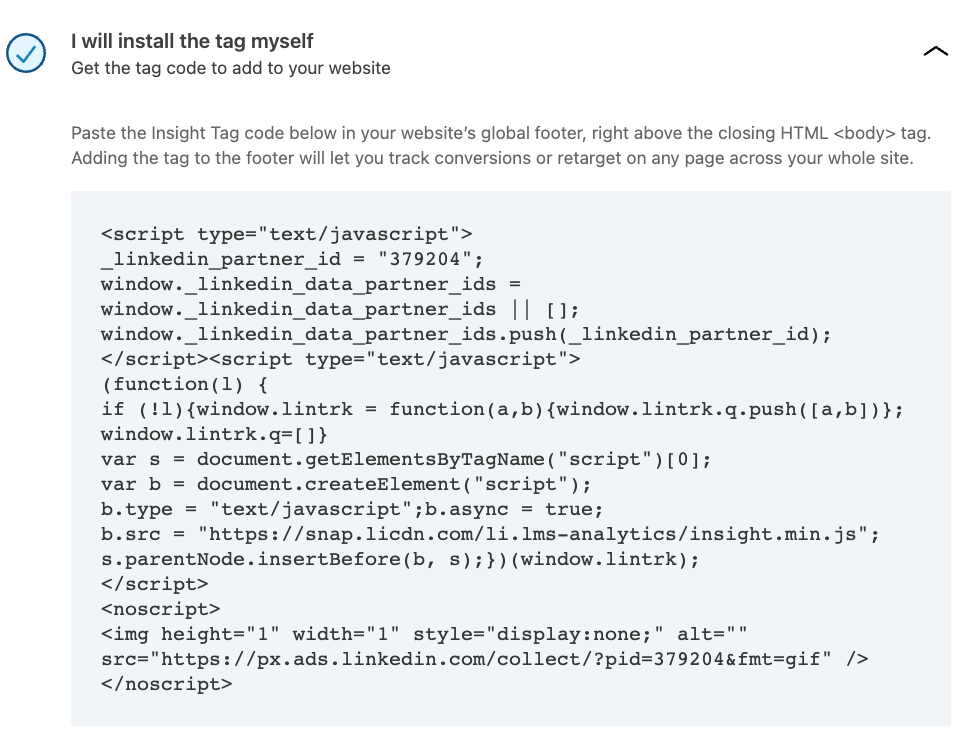
– Add the code to every page.
Paste the Insight Code tag on every page in your website domain. LinkedIn recommends that you paste it just above the closing HTML <body> tag in the global footer.
– Double-check to see if the process worked.
You can do this by heading back to the “Insight Tab” page in your Campaign Manager and making sure your domains are listed. Please note: this can take anything up to 24 hours to appear, so don’t panic if you don’t see them listed right away.
4 – How Do You Retarget People With the LinkedIn Pixel?
So, once you’ve installed the tag, you can see it in action when checking on your campaign’s progress in the KPI area. Here’s how:
– Go back to Campaign Manager.
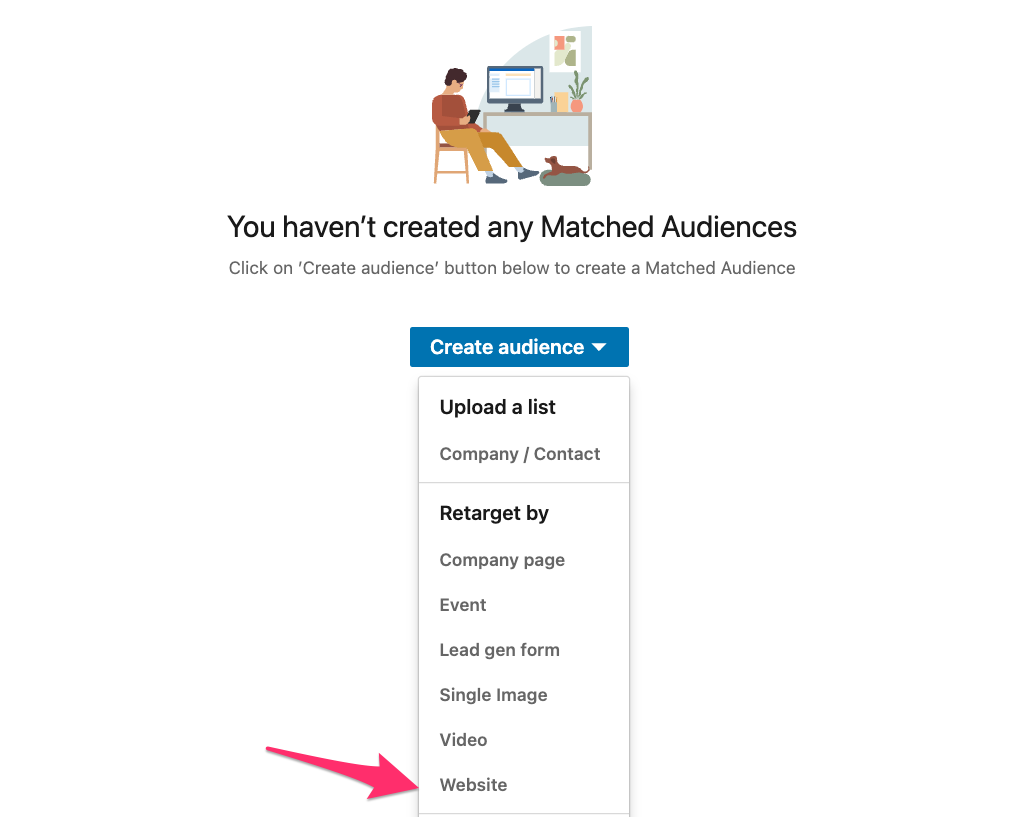
– Click on “Account Assets” and select “Matched Audiences” from the drop-down menu.
– Click the blue Create Audience button, which will be at the top right side of the page, and select “Website” from the dropdown menu.
– Give your retargeting audience a name (make a note of it if you’re prone to forgetting and make sure other admin users have this information), and add the website URL where the LinkedIn tag has been placed.
– Click “Create”.
You will need a minimum of 300 audience members for your campaign to be active and to garner any success. Once you’ve done this, you’ll be good to go with building and publishing your campaign.
The good news here is that once your campaign is live, you can then customise the subsets of your website visitors to target users who have visited specific pages on your website via filters. To do this, choose between “Pages That Start with This URL,” “Pages That Have This Exact URL,” or “Pages That Have URLs That Contain The Specified Text.”
5 – How to set up LinkedIn Conversion Tracking with LinkedIn Pixel
Here’s how to get going with this nifty little feature:
– Go to Campaign Manager.
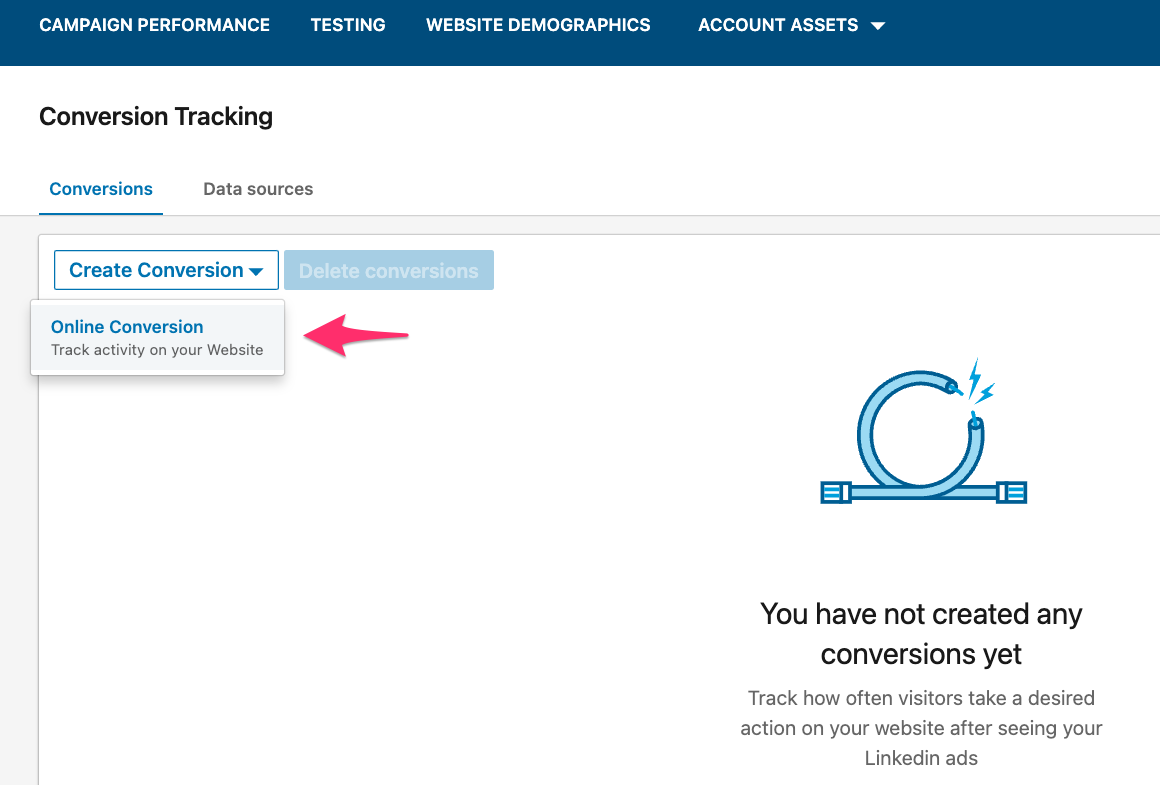
– Click on “Account Assets” and choose “Conversions” from the drop-down menu.
– Click on “Create conversion” which at the top right of the page and choose “ Online Conversion”
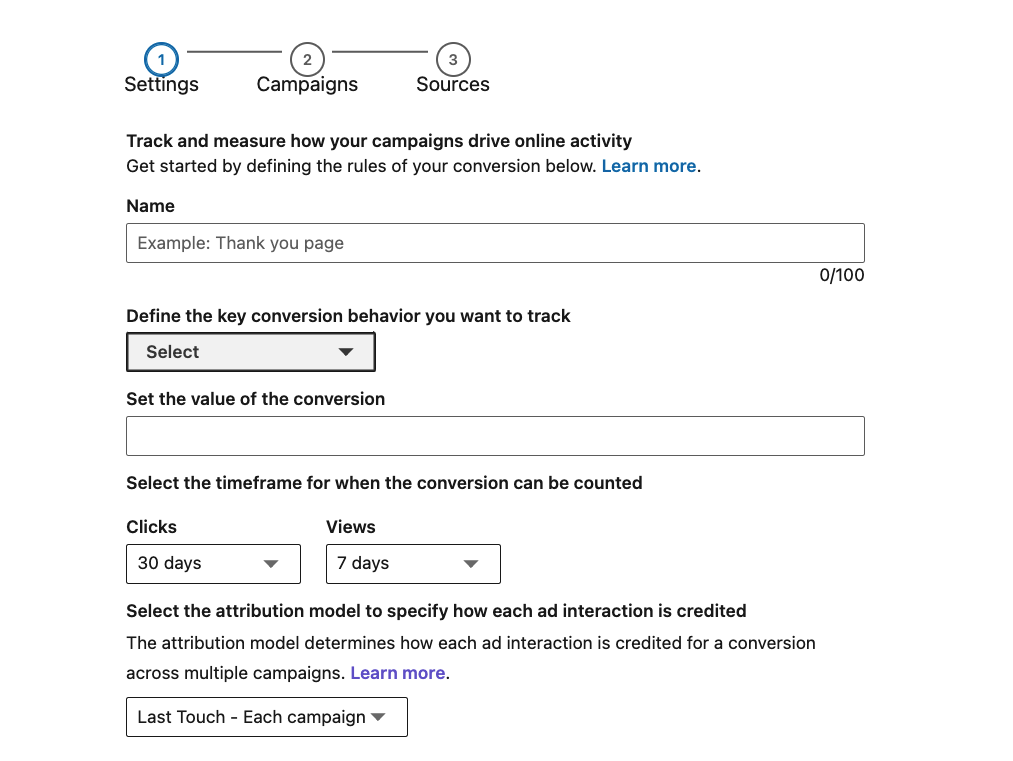
– Give your conversion a name – this will only be visible to you, FYI.
– Enter your settings: “Conversion Type” – This is where you choose which type of behaviour to monitor (video views, purchases, sign-ups, downloads, etc). “Conversion Value” (Optional) – this can help you track your ROI. “Conversion Window” – the timeframe you have set yourself to monitor your conversion rate (daily, weekly, month). “Attribution Model” – This is where you’ll decide what constitutes as a conversion.
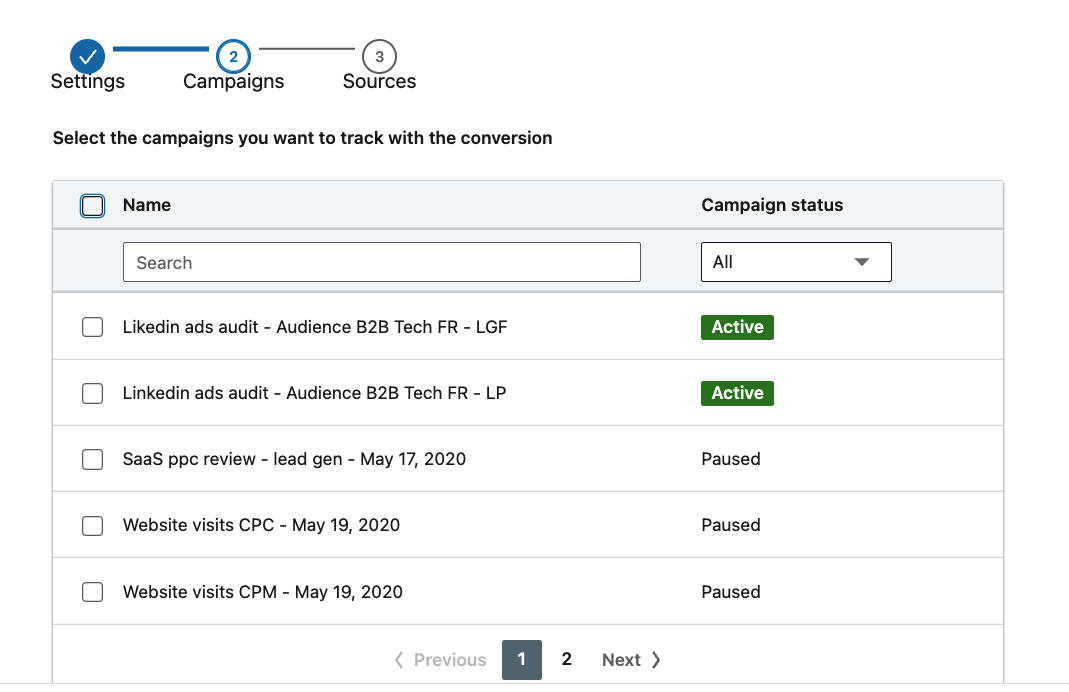
– Use the checkboxes to select which campaign/s you will be monitoring for conversions. This is important if you have more than one campaign that you don’t want to be lumped together in terms of conversion monitoring.
– Choose your conversion method of preference (the Insight Tag) and enter the URL of the site where you’ll be tracking the conversions.
– Click “Create”.
6 – Advanced Steps for LinkedIn Conversion Tracking
After grasping the basics of LinkedIn tracking, it’s time to dive into more advanced settings for conversion tracking to optimize your campaigns further.
Setting a Value for LinkedIn Ads Conversions
LinkedIn Ads doesn’t support dynamic value tracking like some other platforms, but you can still set a fixed value for each conversion. This could be the cost of an event ticket, the average order value of a product, or any other static amount. Assigning a monetary value is not mandatory, but it helps in measuring the return on investment (ROI) of your campaigns.
Choosing the Right Conversion Window
The conversion window is the period during which a conversion is counted after someone interacts with your ad. You can set separate windows for click-through and view-through conversions. Typically, a 30-day click conversion window and a 7-day view conversion window are used, but these can be adjusted based on your sales cycle and the nature of the conversion. For longer sales cycles or larger purchases, consider extending the window to capture delayed conversions.
Selecting an Attribution Model for LinkedIn Ads
Decide how you want conversions to be attributed to your campaigns. The options are to attribute conversions to each campaign that had an interaction within the conversion window, or only to the last or most recent campaign. The latter, known as the “Last Campaign” model, is often preferred for simplicity and clearer campaign management. It avoids the confusion of counting the same conversion multiple times across different campaigns.
Linking Conversions to Specific Campaigns
In the next step, select which of your campaigns should be tracked for the defined conversion. You can assign conversions to existing campaigns or leave this selection for later. This flexibility allows you to tailor tracking to your campaign structure and objectives.
Defining Conversion Tracking Method and URL
Finally, decide how you want to track conversions. The default method is “Page Load,” ideal for tracking visits to a specific ‘Thank You’ or confirmation page after a form submission or transaction. Specify the URL that indicates a completed conversion, such as the URL of your thank-you page. You can also use URL matching options like “Starts With” or “Contains” for more complex tracking setups involving multiple pages.
By following these steps and utilizing LinkedIn’s conversion tracking features effectively, you can gain detailed insights into how your LinkedIn Ads are driving specific user actions, enabling better optimization and ROI measurement of your campaigns.
How To Test LinkedIn Conversion Tracking
Finally, it’s crucial to test if your LinkedIn Ads Conversion Tracking is working correctly.
- Go to the ‘Analyze’ drop-down menu in the Campaign Manager, and click on the ‘Data Sources’ tab. Here you’ll see if LinkedIn is receiving signals from your Insight Tag.
- If it shows as “unverified,” there may be issues with your Insight Tag, or LinkedIn might need more time to register the data. Ensure your website is receiving traffic and check back after 24 hours.
- Once you see the “Active” status, you can check the ‘Conversions’ tab, which lists all your conversions and the latest signal received by LinkedIn Ads.
- For a direct test, complete a conversion action yourself and wait for the signal to show up in the conversion tab.
7 – How to Use the LinkedIn Pixel to Create Your First Remarketing Campaign
Now that you’ve completed all of those steps, you’re ready to create your first remarketing campaign! Before you do this, however, you’ll need to build your retargeting audiences. Here’s how:
– Open the “account assets” drop-down menu, and click the “matched audiences” link.
– Guide your mouse over the “create audience” button and click the “website” link under retargeting sources.
Your first audience should be a basic audience comprised of all your website visitors. It’s wise to name it “all visitors” to be clear what it is, and then set the targeting option to “contains” and your website’s domain.
For maximum conversion success, it is recommended to be as specific as possible about your audiences because you can tailor your ad content to them based on their previous behaviours, which will give you a better chance of appealing to them and their needs.
Once you’ve done this, you can then create a new audience. To do this, you’ll need to set the name to visited “Product Page” and include the product name in the “Contains” field. Be sure to enter it how it appears in the product page URL – not the title. And as before, you’ll need a minimum of 300 members on your list.
Create Your Remarketing Campaign
To create your remarketing campaign, you’ll need to head back to the main Campaign Manager page and create a new campaign group. Create the group name and start date, and save it. Once you’ve done this, you can then click your new campaign group and create your new campaign.
This next part is also pretty important! Make sure you narrow down your audience so that it’ll hit the right people. To do this, choose the “Retargeting” audience and click the “Website” link. Finally, select one of the retargeting lists you’ve already created.
Everything from here on in is the same as when you’re creating a regular ad campaign on LinkedIn:
– Choose the ad format.
– Edit the placement settings.
– Set the budget.
– Make sure the landing page is ideal for the audience.
– Click “Save”.
Conclusion
So, congratulations! Not only are you ready to utilise the Insight Tag/Tracking Pixel on LinkedIn, but you’re also ready to rock ‘n’ roll with your very first retargeting ad campaign.
Following these steps are quick and easy, and you will be able to monitor your campaign’s success in real-time with the tracking pixel cookie planted on your website, as well as LinkedIn’s standard KPIs. Just remember to be transparent with leads about your data collection and usage, so as not to ruffle any feathers!
If you’d like to learn more about how we help B2B SaaS and Tech companies grow their revenue through LinkedIn advertising, contact us online or send us an email today at info@getuplead.com to speak with someone on our team.
You might also be interested:
- Linkedin Ad Campaign Objectives: How to Choose the Right One
- LinkedIn Ads Targeting Options: The Complete Guide
- How to add a User to LinkedIn Campaign Manager?
- LinkedIn Retargeting: How It Works & How to Set It Up
- Linkedin Bidding Strategies: The Complete Guide
- LinkedIn Ad Optimization: Tips and Best Practices